3 Exercises to Increase Your Pushups INSTANTLY!: Improve your Push Ups with Healthier Shoulder Blades
How to Improve Scapular Function and Increase the Number of Pushups you can Perform
Pushups are a fundamental bodyweight exercise known for their effectiveness in building upper body strength and increasing muscle size. They are easy to perform and because of their portability, they lend themselves to high amounts of volume, making them an ideal upper body muscle builder.
However, I am so surprised by how many people cannot perform a push up correctly. As a trainer, I see all kinds of errors, from arching at the low back, or not coming down far enough or even not locking the elbows out at the top of the movement.
Many fail to realize the significance of proper scapular motion and stability required to perform a push up correctly. Proper scapular mechanics are crucial for avoiding shoulder injury and maximizing your ability to perform more push ups consecutively.
Regardless of whether you are trying to attain your first pushup or are looking to increase the number of pushups you can perform, these simple exercises can benefit you.
Proper Scapular Function
The mistake that I see all the time when people are performing push ups involves scapular motion or motion of the shoulder blades. The shoulder blades need to protract (spread apart) and retract during the pushup.
To be more specific, the shoulder blades need to be protracted when at the starting position or at the top of the pushup so that they have enough space to move together and retract as one descends to the bottom of the pushup. When you press out of the bottom to complete the rep so that they can protract again.

A lot of those who struggle to do push ups fail from the start to protract their shoulder blades. Their shoulder blades are already retracted at the top position, leaving them no room to retract during the descent, making it so that the wrong muscles are loaded. These muscles are not strong, making it very difficult to press out of the bottom or to even get to the bottom without extreme arch of the back and strain on the shoulders.
So when you set up for the pushup. Make sure that your hands are a little outside of shoulder width with your fingers pointing forward and your elbows locked out. Your feet can be a foot apart or together with your toes digging into the floor and your heels pointing towards the ceiling.
Before you begin your first pushup, push yourself away from the floor, keeping your elbows locked apart. Don’t let your butt come up, stay in a straight line from your head to your feet. As you try to push yourself away from the floor, think about getting as much space between your shoulder blades as you can.
With your shoulders protracted. You are now ready for the descent for the pushup. As you descend let your elbows flare out and back at a 45 degree angle. Squeeze the floor between your hands to engage your chest muscles. Hold the bottom position for a moment before pressing back to the start.
If you struggle with this. Start with a simple superman to improve your shoulder blade muscles.
Superman with Scapular Retraction
The upper back muscles have a lot of different functions and many are not aware of how to use them appropriately. I use the superman exercise to help people learn how to use their shoulder blade muscles and how to “feel” them during pressing movements. As a side effect this move will also improve upper body posture, shoulder mobility and neck posture.
Lying on your stomach on a bench or the floor, extend at your low back and pick your chest up off the floor as high as you can. Your feet may leave the floor as well, this is ok. Don’t extend so hard that you give yourself lower back pain, just enough to bring your chest off the floor.
Now, put your arms straight out in front of you like you are superman flying through the sky. Your palms should be facing the floor. Slowly bend at the elbows and bring your hands back towards your head until your elbows are at a ninety degree angle or less. Try to squeeze your shoulder blades as you do. Hold this position for 0:30.
After a 0:30 hold, keeping your hands as high as your head which should be looking forward, press your arms out in front of you again. Do this slowly. Your upper back muscles should be on fire! Repeat for 8 repetitions. Just to be clear, hold for 0:30, then press for 8 reps. Don’t perform the 0:30 hold with each rep unless you really like pain.
Don’t overlook this movement. It not only improves upper body mobility but since shoulder range of motion is tied to lower back and hip health, you may see a marked improvement in overall mobility and a reduction in chronic pain
Range of Motion and Strength from the Bottom
Now that your shoulder blades are working properly and your upper back muscles are firing, it’s time to put them in motion with an incline pushup. The incline pushup is a great movement for strengthening the chest muscles and helping people learn to use them during the pushup.
Incline Pushup
This is a standard push up with the same setup, however we are going to elevate the upper body on a sturdy surface like a bench or a table.
A typical incline pushup is a modification to a typical pushup. This variation is performed with feet on the floor and hands on a bench, elevating the upper body and making the movement easier.
Instead, I want you to perform the incline pushup in between two surfaces so that we can go much deeper at the bottom of the rep. Instead of a table, use two chairs or two benches or whatever sturdy objects you can find. Get creative. As you can see below, I use 20 inch boxes.


You can start higher to make the movement easier and work your way down over time


Make sure what you are using is sturdy enough so that you don’t push it over when in the middle of the push up
Performing the incline push up this way still allows us to decrease the angle of the press, making it easier but also allows us to go deeper at the bottom, leading to greater upper back and chest involvement. Frankly, this will allow you to get stronger at the bottom of your push up.
Pinch your shoulder blades together as you descend between the boxes or chairs. Start with a high enough set of surfaces so that the push up is easy enough for you to take it to the deepest range of motion possible. The more you strengthen the bottom part of the movement, the quicker you will progress. You have to train the weak link so that all the others can move forward!
What makes this movement so great is that you can really train the deepest part of the rep with a manageable resistance. Progress this movement by either lowering the boxes or or benches or chairs that you are pressing off of, or you could even raise your feet to bring them closer to the level of a pushup.
Parallel Dip
If you think about it, the parallel dip is just a step up from the incline pushup with more of an emphasis on range of motion. If you can perform one full bodyweight dip with good range of motion, you will be able to perform sets of 10-15 repetitions of push ups with little problem.
In my opinion, the parallel dip is a harder skill to master than the pushup since you are supporting your entire body weight vs. maybe half of that in the pushup.
When performing the parallel dip, grip the bars hard with your hands and don’t let your wrist bend. Try to keep it straight as if you were punching straight towards the ground. This may not feel comfortable at first but it will improve the position of your wrist when you are at the bottom of the dip.
Slowly descend letting your elbows flare out out at a 45 degree angle. You don’t want your elbows to go straight backward. This puts too much stress on your shoulder. By flaring the elbows out a little you can put a greater stretch on the chest muscles.
You may not be comfortable with it yet, but try to sink as low as feels comfortable before pressing back up to the start position.
The parallel dip is more challenging than a pushup. So it is a very good possibility that this skill is unattainable at the current point. That’s ok. There are a number of things we can do.
For my clients, I tie a band around the bars and let them put their knees on it so that when they descend the band stretches and provides elastic assistance to the top.
Some gyms have assistance machines designed to help you if you can’t perform a pull up or dip. These can be useful when you are not ready for a full bodyweight dip.
If you don’t have these at your disposal but have a means to perform parallel dips, then I suggest you focus on the eccentric or the “lowering” portion of the dip. This will force the muscle to focus on the lengthening portion of the exercise. Eccentrics are superior to any other phase of a lift in terms of strength and size gains.
You can also try putting a box or chair behind you to put your feet on. This will take some resistance off as well. There are plenty of options!
If you don’t have parallel bars at your disposal and don’t feel like going to your local park, you can simply use the same chairs you did for the incline push ups.
Place them close enough for you to go between and practice holding yourself up. Once you have mastered holding yourself up for 0:20, you can start to lower yourself to the floor slowly.
If you experience wrist pain, try different hand positions. If you continue to experience wrist pain or any other type of pain, just double up on the incline pushup. You may not be ready for this movement yet.
Increase Volume (Press More to Press More)
Making progress in any type of pressing movement is usually very dependent on volume or how often you are practicing the movement. The pushup responds very well to constant practice. The good news is that you can practice the push up anywhere! If you are bored you can drop down and practice your pushups. If you see a set of chairs you can practice your incline pushups. If you find a set of parallel bars or the corner of a kitchen island you can practice your dips.
Strength sometimes takes practice, and the pushup is no exception. The more you do push ups, the better you will get at them. And if you need…
Extra Challenge
There are many ways to make the push up more challenging. You can add resistance or even slow up the tempo of your pushup. Check out the “Bring Sally Up” pushup challenge. Warning! It is for advanced trainees.
Training Protocol
The pushup is versatile. It can function as a rehabilitative exercise as well as a strength and muscle builder. When it comes to improving scapular function, shoulder health and overall chest musculature, the pushup is key, and these exercises are your ticket to increasing your pushup count.
Below are some sample plans to run regardless of your skill level. There is something for everyone here. Mix and match the exercises for a total of 10 sets per workout, 2 to 3 times per week. If you decide to do 3 sessions per week, lower the number of sets performed to 5 per workout for a total of 15.
Now go increase your Pushups!!!
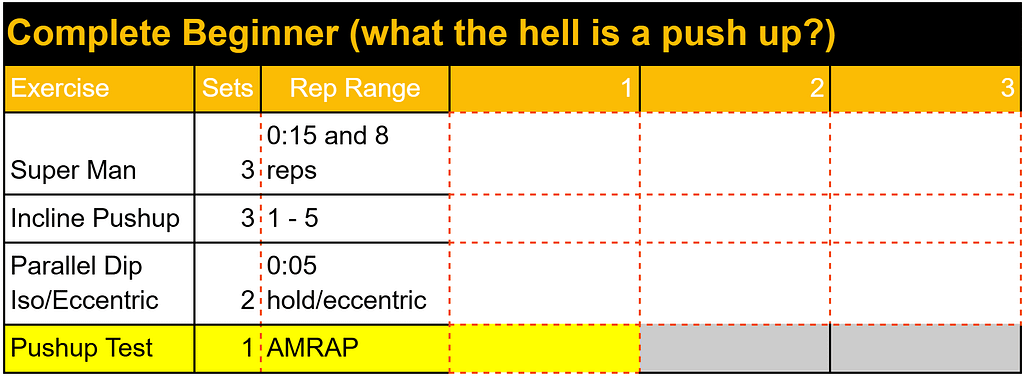
Beginner
If you are a beginner I am excited for you. Depending on strength to bodyweight ratio, you will be performing pushups in 1 to 2 sessions.
Perform the aforementioned exercises for 3 sets each (2 sets of parallel dip holds/negatives).
Week 1: 2 sessions per week
Week 2: 3 sessions per week
Week 3: 2 sessions per week
Week 4: 1 session per week
Week 5: complete rest
After a rest in week 5 you can start the program over again and add a session per week if you are recovering well. As soon as you can perform one great push up from the floor, practice it every chance you feel like it. The more you practice, the better you will get at them and the easier they will be for you.
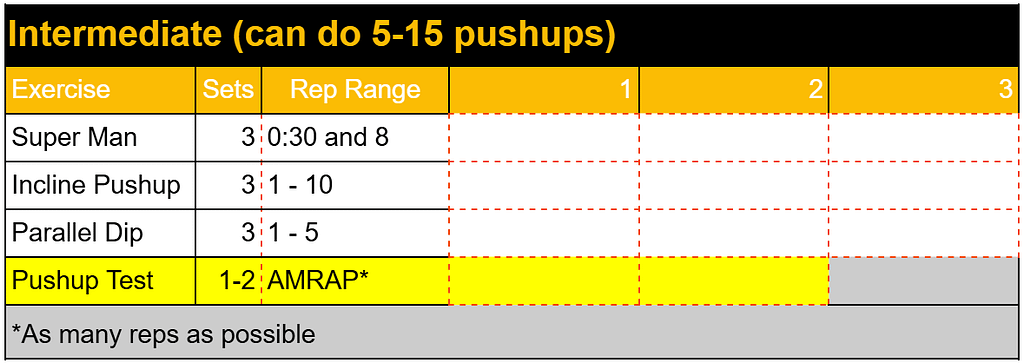
Intermediate
Pretty basic plan here. Perform 3 sets of each of the aforementioned exercises each workout. Focus on the quality of your repetitions. DON’T go to failure. Leave a rep or two in reserve for each set.
At the end of each workout, take one or two sets to test your max pushups.
Perform 3 sessions per week with preferably 24-48 hours rest in between workouts.
After 3 weeks, take a full week off before starting the program again for another 3 weeks. Eat plenty of protein and sleep well and you will see improvements in your max pushups!
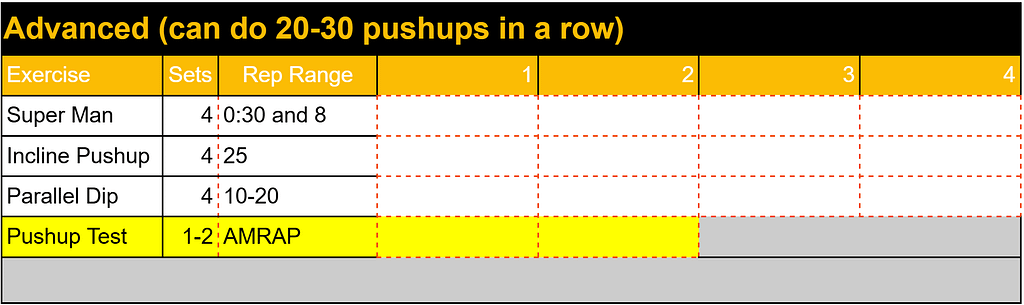
Advanced
For advanced trainees we are upping the repetitions and the sets. You can add resistance where you like but remember to leave one or two repetitions in reserve with each set so that you can recover and squeeze more volume in.
Perform 1-2 amrap sets of pushups at the end of each session. Aim for 100 pushups in 2 sets as an ultimate goal.
Perform 3-4 sessions per week with 24-48 hours of rest between workouts.
After 4 weeks, either take a full week off or cut the sets and reps in half. You can then decide if you want to run the program again for 4 weeks or change to something new. My general rule of thumb is to run a program until the progress comes to a halt. In other words, if you are unable to add sets and reps to each workout it is time to switch to something new, given that your recovery is optimal.
If I assume you have no knowledge of how to perform a pushup and have never performed one, here is the program I want you to run 2-3 times per week. Each session should take no longer than a half hour, however don’t rush through it. Take your time and focus on the quality of each rep.
A Quick Word on Recovery
Your success with this plan is determined mostly by your adherence to performing the weekly sets, however, it is also imperative that you recover from these workouts. Eat enough protein to rebuild muscle, sleep 7-8 hours per night and manage your stress levels.
Regardless of your skill level, within 3 weeks or less you will see an increase in the number of quality pushups you can perform.
When starting out, work your way up slowly with each movement
Key Takeaways
References:
Marquina Nieto M, Rivilla-García J, de la Rubia A, Lorenzo-Calvo J. Assessment of the Speed and Power of Push-Ups Performed on Surfaces with Different Degrees of Instability. Int J Environ Res Public Health. 2022 Oct 22;19(21):13739.
Beach TA, Howarth SJ, Callaghan JP. Muscular contribution to low-back loading and stiffness during standard and suspended push-ups. Hum Mov Sci. 2008 Jun;27(3):457-72.
Freeman S, Karpowicz A, Gray J, McGill S. Quantifying muscle patterns and spine load during various forms of the push-up. Med Sci Sports Exerc. 2006 Mar;38(3):570-7.
Marcolin G, Petrone N, Moro T, Battaglia G, Bianco A, Paoli A. Selective Activation of Shoulder, Trunk, and Arm Muscles: A Comparative Analysis of Different Push-Up Variants. J Athl Train. 2015 Nov;50(11):1126-32. doi: 10.4085/1062-6050-50.9.09. Epub 2015 Oct 21.